Adding a Fediverse Comments Box to a Nikola Site

For (almost) all the years that I've had a personal website, I've not had a comments section. The reasons behind this changed with time, though at one point I had moderation duties elsewhere and didn't really fancy also dealing with that on my own site.
But, comments are not without their value: they can be really helpful, particularly if they provide information that you might have missed or overlooked.
Last year, I played around with embedding webmentions in order to add a comment-like section to my website. However, I recently decided that I wasn't comfortable with the idea of scooping comments out of social media for storage and display elsewhere and so have disabled them.
As part of that process, I had a search around the web and read other people's thoughts on the topic. Some of those who agreed that webmention backfeeds are too invasive have instead settled on an alternative solution that I quite like.
You can see some good examples on Robb Knight's site:
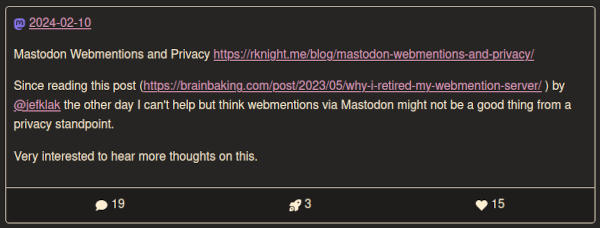
Social media activity is no longer pulled in and displayed, instead remaining in the fediverse (which allows users or instance admins to continue to edit and delete as normal). Clicking any of the icons in the block will take the reader into the fediverse where they can see those actions.
In this post, I talk about updating templates to add similar functionality to a static HTML site generated with the Nikola SSG.
Approach
There's no need for us to write any custom javascript in support of this effort, because there's already a solution out there: mastodon-post (the author's original writeup can be found here).
What we're going to do is:
- Update the
poststemplate to check for the existence of a mastodon post URL in the metadata - Have it embed the necessary boilerplate and a reference to
mastodon-post
To have the section display on any particular post, we'll then just need to add the item to its metadata.
Javascript
Let's first grab a copy of the javascript library and make it available via our site
# The version of mastodon-post to grab
REL="1.2.0"

# Make sure the directory exists
mkdir -p files/assets/js

# Fetch the release
wget https://github.com/daviddarnes/mastodon-post/archive/refs/tags/v${REL}.tar.gz

# Extract and move in place
tar xzf v${REL}.tar.gz
mv mastodon-post-${REL} files/assets/js/mastodon-post
Updating a Post
We're obviously going to want at least one post to link out to a mastodon post so that we can verify that things are working.
So, choose a post and add a mastodon_post entry to the metadata:
.. title: Yellow SV650
.. slug: 482-yellow-sv650
.. date: 2008-03-01 09:34:49 UTC
.. updated: 2019-10-01 11:09:57 UTC
.. tags: Vehicles,SV650,Motorcycle,Yellow
.. category: photography-archives/vehicles
.. author: Ben Tasker
.. previewimage: images/photos-archive/resized/1-100/25-10-600-450-90-wm-right_bottom-100-watermarksmallpng.jpg
.. description: Side view of a yellow SV650-S with lower cowling
.. mastodon_post: https://mastodon.bentasker.co.uk/@ben/111550991166162347
Editing the Theme
We now need to edit the theme so that it checks for the existence of this metadata and creates an embed if it exists.
Creating a Custom Theme
If you haven't already made changes to your chosen theme, it may not yet exist in the themes directory.
You can check this by first extracting the theme name from config
grep "THEME =" conf.py
Then, look in the themes directory to see whether it's there
ls themes/
If it isn't there, you can tell Nikola to create a copy of it (give it a new name of your choice)
nikola theme -n <new theme name> --parent <theme name> --engine mako
Nikola will copy the base files down into the directory.
Edit conf.py to set the theme name to your newly chosen name
THEME = "bootblog4-btasker"
Copying the post template
By default, Nikola probably won't have copied the post template in, so check whether it exists and copy it in if not:
THEME="bootblog4-btasker"
if [[ ! -e themes/$THEME/templates/post.tmpl ]]
then
    nikola theme -c post.tmpl
fi
Editing the Post Template
Now that we have a copy of the template, it's time to add a section which will check for the existence of the underlying metadata and add a display block if it's present.
nano themes/$THEME/templates/post.tmpl
As the name suggests, this template is used to render posts. You'll probably want to add the boilerplate just after the closing </article> tag.
Wherever you chose to add it, insert the following:
% if post.meta('mastodon_post'):
    <div class="mastodon-embed">
        <script type="module" src="/assets/js/mastodon-post/mastodon-post.js"></script>
        <mastodon-post>
          <a href="${post.meta('mastodon_post')}">
            Discuss on Mastodon
          </a>
        </mastodon-post>
    </div>
% endif
Save and Exit (Ctrl-X, y)
If we were to render the site and view in a browser, the result would look something like this:

All the information's there, but there's currently no meaningful styling.
As a starting point, I added the following to files/assets/css/custom.css:
.mastodon-embed {
  display: block;
  width: 70%;
  margin: auto;
}

mastodon-post > a {
  font-size: 1.3em;
  border-bottom: 1px solid;
  width: 100%;
  display: block;
  margin-bottom: 10px;
}

.mastodon-embed blockquote {
  max-width: 100%;
}

.mastodon-embed dt, dd {
  display: inline-block;
}

.mastodon-embed dt::after {
  content: ": ";
}

.mastodon-embed dd {
  margin-right: 30px;
  margin-bottom: 0px;
}

.mastodon-embed cite {
  display: none;
}

.mastodon-embed dl {
  border-top: 1px solid;
  padding: 10px;
  border-bottom: 1px solid;
}
The result looks like this:

Customising Further
I wanted to tweak the appearance a bit further, though. In order to do this, we have to provide the module with a template to use.
The default template looks like this:
<figure>
  <blockquote data-key="content"></blockquote>
  <figcaption>
    <cite>
      <a data-key="url">
        <span data-key="username"></span>
        @
        <span data-key="hostname"></span>
      </a>
    </cite>
    <dl>
      <dt>Reposts</dt>
      <dd data-key="reblogs_count"></dd>
      <dt>Replies</dt>
      <dd data-key="replies_count"></dd>
      <dt>Favourites</dt>
      <dd data-key="favourites_count"></dd>
    </dl>
  </figcaption>
</figure>
The changes that I wanted to make were:
- Change the order of the vanity counters
- Replace the vanity counter text with icons
- Add an explicit call to action
- Remove the
citesection
I didn't do anything special for the icons, just used stamps in LibreOffice draw and then used Gimp to add transparency and scale down:
![]()
![]()
![]()
Implementing the changes was just a case of re-editing post.tmpl to insert the template, giving it an ID of mastodon-post-template:
% if post.meta('mastodon_post'):
    <template id="mastodon-post-template">
    <figure>
      <blockquote data-key="content"></blockquote>
      <div class="actioncall"><a data-key="url">Join The Conversation In The Fediverse</a></div>
      <figcaption>
        <dl>
          <dt><img src="/images/social-icons/reply-icon.png"></a></dt>
          <dd data-key="replies_count"></dd>
          <dt><img src="/images/social-icons/boost-icon.png"></dt>
          <dd data-key="reblogs_count"></dd>
          <dt><img src="/images/social-icons/favourite-icon.png"></dt>
          <dd data-key="favourites_count"></dd>
        </dl>
      </figcaption>
    </figure>
    </template>

    <div class="mastodon-embed">
        <script type="module" src="/assets/js/mastodon-post/mastodon-post.js"></script>
        <mastodon-post>
          <a href="${post.meta('mastodon_post')}">
            Discuss on Mastodon
          </a>
        </mastodon-post>
    </div>
% endif
A quick CSS tweak:
.mastodon-embed {
  display: block;
  width: 70%;
  margin: auto;
}

mastodon-post > a {
  font-size: 1.3em;
  border-bottom: 1px solid;
  width: 100%;
  display: block;
  margin-bottom: 10px;
}

.mastodon-embed blockquote {
  max-width: 100%;
}

.mastodon-embed dt, dd {
  display: inline-block;
}

.mastodon-embed dt img {
  width: 20px;
}

.mastodon-embed dd {
  margin-right: 30px;
  margin-bottom: 0px;
}


.mastodon-embed dl {
  border-top: 1px solid;
  padding: 10px;
  border-bottom: 1px solid;
}

.mastodon-embed .actioncall {
  padding-bottom: 5px;
}
And then I rendered the site with
nikola build
Visiting the post I was testing with revealed this:

I'm neither a styling or design master, but I think that looks OK.
If you're viewing my site in light mode, it should look more like this

New Article Publishing Process
With everything now in place, it's just a case of adjusting the way in which posts are published.
The new process is quite simple, after the usual draft & revision process, we need to:
- Toot out the post URL
- Bookmark the toot (this is necessary because my toots normally auto-delete)
- Copy the URL of the toot
- Update the post's metadata to add
mastodon_post - Republish the post (and flush it from the CDN cache)
I did think about automating the process, but it's doesn't quite feel worth the effort, especially as the process is relatively forgiving to mistakes (I can always add the post information later if needed).
Caveats
There are some caveats inherent with using mastodon-post to render toot information client-side.
Obviously it requires that the user has javascript enabled. But, then, they're not going to get very far viewing Mastodon without it, so this doesn't feel like a huge concern.
mastodon-post faithfully embeds the HTML that's provided to it by mastodon's API: it's entirely reliant on mastodon having correctly sanitised that HTML, and any failure to do so could potentially enable XSS. I don't love this, but it should be fine as I'm only embedding my own posts. Clearly, though, I'd need to think much more carefully before considering embedding someone else's.